27 Chaulden Terrace,
Hemel Hempstead, Hertfordshire HP1 2AN
Hemel Hempstead, Hertfordshire HP1 2AN
Mon - Sat : 8.00 - 18.00
info@mandppavingcontractors.co.uk
info@mandppavingcontractors.co.uk
Brett Approved Paving Contractor & Driveway Installer Working Across Herts, Bucks and Middx Areas.
 Purchasing a paved driveway or patio for your home or property is a sizable investment, and like all investments, M & P Paving Contractors as a Brett accredited installer (Brett Membership M and P Paving Contractors Hemel Hempstead Brett Approved Number:398) provides Block Paving installations that are installed to last and provide value for your money. This is achieved by keeping to strict standards of preparation and process to ensure that your driveway or patio is installed on a sound foundation.
Preparation – our approach to getting your job done
Preparation is the most important aspect of the job as this determines the quality of the finished product. The outcome of the job is only as good as the preparation work done prior to installation.
The steps we take
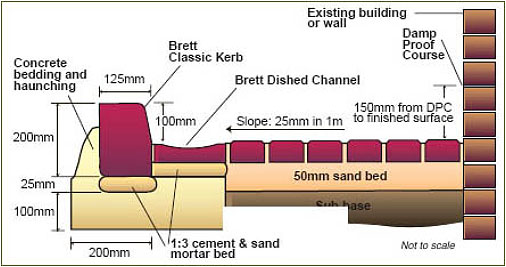
Step 1 Mark out the area to be paved and remove all the existing surfacing to a depth so that the finished level is at least 150mm (2 bricks) below the damp proof course. For drainage purposes create a 1:80 slope during excavation that runs away from any building or fence.
Step 2 Install any manhole covers, drainage channels and edge restraints as required.
Step 3 Fill the excavated area with at least 100mm of sub-base material and compact well with the plate vibrator, filling voids with sharp sand.
Step 4 Spread sharp sand to a depth of 50mm, compact it with the plate vibrator and spread a further 15mm of sharp sand over the area as a loose screed and level correctly.
Step 5 Lay one course of blocks on the sand along all edge restraints.
Step 6 Lay the blocks hand tight only, with a joint gap of 2-5mm, starting in one corner and at the bottom if there is a slope. Lay blocks from at least three packs to ensure even distribution of colour. Cut in at edges using a block cutter or bolster chisel and club hammer.
Step 7 Sweep the area thoroughly, particularly if a block cutter has been used. Replace any damaged blocks.
Step 8 Compact the whole area with three to four passes of the plate vibrator in perpendicular directions and overlapping.
Step 9 Sweep Jointing Sand over the entire area, ensuring it gets into all the joints between blocks. Jointing Sand should not be applied in wet weather, as it will not fill the joints properly.
Step 10 Fill any gaps which appear in the joints and vibrate the whole area again. Repeat until there are no gaps and leave any surplus sand for the wind and rain to wash into joints as they settle.
Call us today to arrange your FREE CONSULTATION and no obligation quotation.
Hemel Office: 01442 252870
Mobile: 07970 626465